

How To Create A Night Sky In Photoshop
Create A Starry Nighttime Heaven In Photoshop
Learn how easy information technology is to fill your night skies with a field of stars in Photoshop! Yous'll learn how to create stars in Photoshop, how to add a glow and color to the stars, and how to blend the stars issue with your images!
In that location'due south nothing quite every bit peaceful as being outdoors at night, looking up at a clear sky, and seeing an endless field of stars stretching off in all directions. And in that location are few things as frustrating as trying to capture those stars with your camera. Competing lights from the metropolis or other nearby sources can throw off the exposure and push your stars into darkness. And with our planet ever spinning, capturing that faint star lite with long exposures often results in a blurry mess.
Thankfully, as we'll come across in this tutorial, it's easy to add together stars to your images with Photoshop! And since nosotros're creating the stars ourselves, we take complete command over just how "starry" the heaven appears. In fact, the techniques we'll exist learning here are the same ones used to create star-filled backgrounds in movies. So while the results probably won't fool whatever astronomers in the family, this star effect is more than realistic enough for pretty much everyone else.
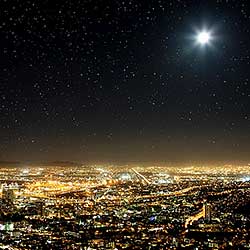
I'll use this image that I downloaded from Adobe Stock:

The original image. Photograph credit: Adobe Stock.
And here'due south what the final stars result will look like when we're done:
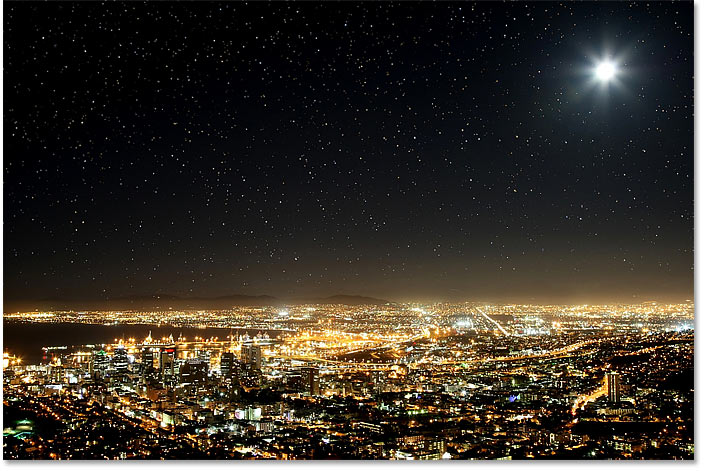
The terminal result.
Let'south get started!
How to create stars in Photoshop
For this tutorial, I'k using Photoshop CC but every step is compatible with Photoshop CS6. You can besides follow along with my video of this tutorial on our YouTube channel. Or download this tutorial as a print-readyPDF!
Footstep 1: Add a new blank layer in a higher place the image
Starting time, nosotros'll learn how to create stars in Photoshop, and and so we'll larn how to alloy the stars with your prototype.
Allow's start in the Layers console where we see our image sitting on the Background layer:

The Background layer is currently the only layer in the document.
We'll create the stars on a split up layer higher up the image. To add a new layer, press and concord the Alt (Win) / Selection (Mac) key on your keyboard and click the Add New Layer icon:

Clicking the Add New Layer icon.
In the New Layer dialog box, name the layer "Stars", and then click OK:

Naming the new layer "Stars".
And back in the Layers panel, the new "Stars" layer appears:

The Layers panel showing the new "Stars" layer.
Step 2: Fill the layer with blackness
We need to make full the "Stars" layer with blackness. Go upward to the Edit card in the Card Bar and choose Fill:

Going to Edit > Fill.
In the Fill dialog box, change the Contents option to Black, and and then click OK:

Irresolute "Contents" to Black.
And Photoshop fills the layer with blackness, temporarily blocking the image from view:

The result later on filling the "Stars" layer with black.
Pace three: Add some racket with the Add Noise Filter
To create the stars, we'll add together noise using Photoshop's Add Noise filter. Become upwards to the Filter menu, choose Dissonance, so cull Add Noise:

Going to Filter > Racket > Add Noise.
In the Add Noise dialog box, set the Corporeality to l%, and make sure that Gaussian and Monochromatic are both selected:

The Add together Racket filter settings.
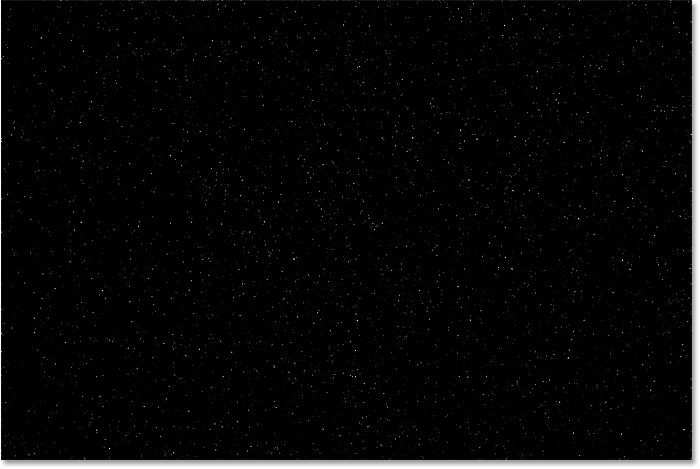
Then click OK to shut the dialog box, and Photoshop fills the layer with random racket:

The effect after filling the 'Stars' layer with noise.
Step 4: Blur the noise with the Gaussian Blur filter
Adjacent, we demand to mistiness the noise, and we can do that using the Gaussian Mistiness filter. Go upwardly to the Filter carte du jour, choose Mistiness, and then choose Gaussian Mistiness:

Going to Filter > Blur > Gaussian Blur.
In the Gaussian Blur dialog box, fix the Radius value to one.v pixels, then click OK:

Setting the Radius value to 1.5 pixels.
Step 5: Plow the racket into stars with a Levels paradigm adjustment
To turn the noise into stars, nosotros'll use a Levels image adjustment. Get up to the Paradigm menu, choose Adjustments, and then cull Levels:

Going to Prototype > Adjustments > Levels.
Dragging the white point slider
In the Levels dialog box, click and elevate the white bespeak slider all the way to the left until you attain the right edge of the histogram:

Dragging the white indicate slider to the right border of the histogram.
This brightens the dissonance and makes the brightest areas white:

The issue after dragging the white indicate slider.
Dragging the black point slider
So click and drag the blackness point slider towards the right. The further you drag, the more yous'll darken the darkest areas of racket, eventually pushing those areas to pure black. Keep dragging to the correct until most the racket has disappeared. The remaining noise becomes our stars:

Dragging the black betoken slider to the correct to darken the noise.
You may demand to become back and forth a few times with the white and black sliders until you're happy with the stars effect. I concluded upward using a white betoken value of 94 and a blackness betoken value of 90. When you're done, click OK to close the Levels dialog box. And here's my effect:
The initial stars effect.
Calculation a glow to the stars
At the moment, our stars just await similar white dots. Permit's help them wait more than like stars by adding a faint glow. Then once we've added the glow, we'll add together some colour.
Step 6: Make a re-create of the "Stars" layer and name it "Glow"
In the Layers console, make a re-create of the "Stars" layer by dragging it down onto the Add New Layer icon:

Duplicating the "Stars" layer.
Photoshop adds the re-create above the original and names information technology "Stars copy":

The new "Stars copy" layer.
Double-click on the name "Stars copy" and rename the layer "Glow". Press Enter (Win) / Render (Mac) to take it:

Renaming the layer "Glow".
Step vii: Add together more blurring with the Gaussian Blur filter
With the "Glow" layer selected, go support to the Filter menu, choose Blur, and in one case over again choose Gaussian Mistiness:
Going to Filter > Blur > Gaussian Blur.
This fourth dimension in the Gaussian Mistiness dialog box, increase the Radius value to 4 pixels. This will mistiness the stars and they'll await too faint, but we'll fix that side by side:
Increasing the Radius value to 4 pixels.
Step viii: Brighten the stars with Auto Contrast
To brighten the stars, become up to the Image menu and choose Auto Contrast:

Going to Image > Auto Contrast.
This makes the blurred stars too bright:

The event later on applying the Auto Contrast control.
Footstep nine: Lower the opacity of the "Glow" layer
And then to darken the outcome, but lower the opacity of the "Glow" layer in the Layers console until you see merely a faint glow around the stars. An opacity value of 20-25% should piece of work:

Lowering the opacity of the "Glow" layer.
Hither's a closer view of my stars showing the faint glow around them:

The result subsequently adding the glow to the stars.
Adding color to the stars
Adjacent, let'due south add some color to the stars, and we'll do that using a Hue/Saturation adjustment layer. Stars often appear equally either blue or a ruby-orange, then we'll start past adding blueish.
Pace 10: Add a Hue/Saturation adjustment layer
In the Layers panel, click the New Fill or Aligning Layer icon:
Clicking the New Fill or Aligning Layer icon.
And then cull Hue/Saturation from the list:

Choosing a Hue/Saturation adjustment layer.
Stride eleven: Select "Colorize" and set the Hue to 220
The options for the Hue/Saturation adjustment layer appear in Photoshop's Backdrop panel. Outset, select the Colorize option, and and then prepare the Hue value to 220 for a light blue. You can also increment the intensity of the color by raising the Saturation value, but I'll leave mine set to 25:

The Hue/Saturation options in the Properties panel.
Step 12: Change the aligning layer'southward blend way to Color
Back in the Layers panel, the Hue/Saturation adjustment layer appears above the "Glow" layer. To change the color of the stars without affecting their brightness, change the alloy mode of the adjustment layer from Normal to Colour:

Changing the blend mode of the adjustment layer to Color.
And here's my stars now colored in bluish:

The result afterwards colorizing the stars blue.
Step 13: Make a re-create of the Hue/Saturation adjustment layer
Along with blue, we'll also add some orange to the stars. In the Layers panel, make a copy of the Hue/Saturation adjustment layer by dragging it down onto the Add together New Layer icon:

Duplicating the Hue/Saturation layer.
Footstep 14: Modify the Hue value to 40
And in the Properties console, change the Hue value for the second Hue/Saturation aligning layer to xl. Go out the other options the aforementioned:

Changing the Hue value to 40.
Back in the Layers console, we come across the second adjustment layer sitting to a higher place the original. Notice that the blend mode is already set up to Color:

The Color blend mode is already selected.
And here we come across my stars, at present colored in orange. The problem is, they're all colored in orange, and nosotros've lost all of our blue stars. So we'll fix that next:

The outcome after colorizing the stars orange.
Step fifteen: Apply the Clouds filter to the layer mask
A overnice feature of adjustment layers in Photoshop is that they include a congenital-in layer mask. To add randomness to the color of the stars, and so some appear blue and others orange, we'll use Photoshop'due south Clouds filter to the second adjustment layer's mask.
In the Layers panel, make sure the layer mask for the top adjustment layer is selected by clicking the layer mask thumbnail:

Selecting the adjustment layer's mask.
The Foreground and Groundwork colors
Before we utilize the Clouds filter, also make sure that Photoshop'southward Foreground and Background colors are set to the defaults, with white as the Foreground color and black as the Groundwork color. If they're not, printing the letter of the alphabet D on your keyboard to reset them:

The default Foreground (upper left) and Background (lesser right) colors.
Tip: How to employ a more intense Clouds filter
The Clouds filter volition fill the layer mask with random areas of white, black and gray. Just past default, the consequence is more gray than annihilation else. To push more of the effect to pure white and pure black, press and hold the Alt (Win) / Option (Mac) primal on your keyboard. So with the key held downwardly, go upwards to the Filter bill of fare, cull Return, then choose Clouds.
Notation that on a Windows PC, you lot'll need to keep your mouse button held down from the moment you click on the Filter card until you reach the Clouds filter, otherwise the carte du jour will keep disappearing on yous:

Going to Filter > Return > Clouds while holding Alt (Win) / Option (Mac).
With the Clouds filter applied to the layer mask, nosotros at present have a nice mix of blue and orange stars:

The effect after applying the Clouds filter to the layer mask.
How to view the layer mask in the document
To view the layer mask itself in the document and so yous tin meet what the Clouds filter has done, press and concur the Alt (Win) / Choice (Mac) primal on your keyboard and click the layer mask thumbnail:

Clicking the mask thumbnail while property Alt (Win) / Option (Mac).
And here nosotros meet the random pattern that the Clouds filter created. The white areas on the mask are where the orange colour from the top Hue/Saturation adjustment layer is visible, and the black areas are where the blue color from the bottom aligning layer is showing through:

Viewing the effect of the Clouds filter on the layer mask.
To switch back to viewing the stars, hold Alt (Win) / Option (Mac) and click once again on the layer mask thumbnail:
Alt / Choice-clicking a 2d fourth dimension on the layer mask thumbnail.
This hides the mask and brings back the stars:
Hiding the mask and viewing the stars.
Related: Photoshop's layer mask tips and tricks!
How to blend the stars with the image
So now that we've created the stars, let'due south learn how to blend the stars in with the prototype.
Step 16: Place all 4 layers into a layer group
The commencement affair we need to do is take all four layers that brand upwardly our stars event (the "Stars" and "Glow" layers, plus the two Hue/Saturation aligning layers) and identify them into a layer grouping.
With the top Hue/Saturation adjustment layer selected in the Layers console, press and hold your Shift key and click on the "Stars" layer. This selects all four layers at once:

Select the top layer, then hold Shift and click on the "Stars" layer.
So click on the menu icon in the top right corner of the Layers console:
Clicking the Layers panel card icon.
And choose New Group from Layers:

Choosing "New Grouping from Layers".
Name the group "Stars", and then click OK:

Naming the layer group "Stars".
And the new layer grouping appears above the image on the Background layer:

All four layers are at present inside the "Stars" group.
Step 17: Change the alloy way to Lighten or Screen
To blend the stars in with the image, change the blend fashion of the layer grouping from Laissez passer Through to either Lighten or Screen. Depending on the epitome, Screen may give you a brighter effect. If information technology'due south too bright, go with Lighten:

Changing the blend mode of the "Stars" grouping to Lighten.
Lighten vs Screen - What's the difference?
The departure between the Lighten and Screen blend modes is that Screen combines the effulgence of both the stars and the epitome to create an fifty-fifty brighter effect, while Lighten just reveals the stars in areas where the stars are brighter than the image. In my example, the Lighten blend mode helps to alloy the stars more naturally with the lite from the urban center and from the moon:

Blending the stars with the image using the Lighten blend mode.
Related: The Peak v alloy modes you demand to know!
Footstep 18: Add a layer mask to the "Stars" group
To end off the effect, all we demand to do is hibernate the stars in the areas where we don't want them to appear, which is everywhere except the sky. And to exercise that, we'll paint those areas away using a layer mask.
With the "Stars" layer group selected in the Layers panel, click the Add Layer Mask icon:

Calculation a layer mask to the "Stars" group.
A layer mask thumbnail appears, letting united states of america know that the mask has been added. And since the layer mask is filled with white, the stars remain visible throughout the image:

The white-filled layer mask thumbnail.
Step 19: Select the Castor Tool
Select the Brush Tool from the Toolbar:

Selecting the Brush Tool.
Stride xx: Gear up your Foreground color to blackness
And so printing the alphabetic character X on your keyboard to swap your Foreground and Groundwork colors, making your Foreground color (your castor color) black:

Press "X" to set your castor colour to black.
Step 21: Paint with black to hide the stars
In the Options Bar, make sure that the Mode (your brush's blend mode) is set to Normal, and that Opacity and Catamenia are both prepare to 100%:

The Brush Tool options in the Options Bar.
Then just paint over the areas in the paradigm where you want to hibernate the stars. To change your brush size from the keyboard, employ the left and correct subclass keys ( [ and ] ). The left subclass cardinal makes the brush smaller, and the right subclass fundamental makes information technology larger.
Here I'm painting over the city forth the bottom of the image to hide the stars from that expanse:

Painting with black on the layer mask to hide the stars from in front of the city.
Viewing your layer mask
To view your layer mask and encounter exactly where you've painted, press and hold Alt (Win) / Selection (Mac) on your keyboard and click on the layer mask thumbnail:

Alt / Selection-clicking on the layer mask thumbnail.
And hither we see the areas on the mask where I've painted with black. The black is where the stars are now hidden, and the white is where they remain visible. To switch back to viewing the paradigm, hold Alt (Win) / Option (Mac) and click again on the layer mask thumbnail:

Viewing the layer mask to meet where I've painted.
How to fix a fault
If you make a error and paint abroad the stars in an expanse where you meant to keep them, press X on your keyboard to gear up your castor color to white and paint over the area to bring the stars back. Then press X again to set your brush colour to black and continuing painting over other areas.
Step 22: Clean up the edges
Finally, if yous look around the edges of your epitome, you may see a few rough spots where it looks like there's too many stars clumped together:

The edges of the effect demand to exist cleaned up.
To make clean upward those areas, brand your brush smaller by pressing the left bracket key ( [ ) a few times on your keyboard. And so, with black still as your brush colour, paint along the edges to hibernate those stars:

Painting with a small castor to hide unwanted stars along the edges.
The Stars event - Earlier and after
To run into a "earlier and after" comparing of the Stars event, you can toggle the "Stars" layer group on and off by clicking its visibility icon in the Layers panel:
Click the visibility icon to turn the Stars effect on and off.
With the layer grouping turned off, we see the original image without the stars:
The original image. Photo credit: Adobe Stock.
And with the layer group turned on, we see my final Photoshop stars upshot:
The final result.
And there we accept it! That's how to add stars to your images with Photoshop! Check out our Photo Effects department for more than tutorials! And don't forget, all of our tutorials are now available to download equally PDFs!
Other Stuff
© 2022 Photoshop Essentials.com.
For inspiration, non duplication.
Site pattern by Steve Patterson.
Photoshop is a trademark of Adobe Systems Inc.
Source: https://www.photoshopessentials.com/photo-effects/starry-sky/
Posted by: haslettahme1937.blogspot.com
0 Response to "How To Create A Night Sky In Photoshop"
Post a Comment